Upload API
PyPreservica provides some limited capabilities for the Upload Content API
https://developers.preservica.com/api-reference/3-upload-content-s3-compatible
The Upload API can be used for creating, uploading and automatically starting ingest workflows with pre-created packages. The Package can be either a native v5 SIP as created from a tool such as the SIP Creator or a native v6 SIP created manually. Zipped OPEX packages are also supported. https://developers.preservica.com/documentation/open-preservation-exchange-opex
The package can also be a regular zip file containing just folders and files with or without simple .metadata files.
Uploading Packages
The upload API client is created using
from pyPreservica import *

upload = UploadAPI()
Once you have a client you can use it to upload packages.
upload.upload_zip_package("my-package.zip")
Will upload the local zip file and start an ingest workflow if one is enabled.
The zip file can be any of the following:
Zipped Native XIPv5 Package (i.e. created from the SIP Creator)
Zipped Native XIPv6 Package (see below)
Zipped OPEX Package
Zipped Folder
Note
A Workflow Context must be active for the package upload requests to be successful.
If the package is a simple zipped folder without a manifest XML then you will want to pass information to the ingest to specify which folder the content should be ingested into. To specify the parent folder of the ingest pass a folder object as the second argument.
upload = UploadAPI()
client = EntityAPI()

folder = client.folder("edf403d0-04af-46b0-ab21-e7a620bfdedf")
upload.upload_zip_package(path_to_zip_package="my-package.zip", folder=folder)
For large packages it is more reliable to send the submission to a cloud hosted storage location connected to a ingest workflow. The available transfer locations are shown on the Preservica administration sources tab. The ingest can then be triggered automatically once the submission is saved to the cloud location.
upload = UploadAPI()
client = EntityAPI()

folder = client.folder("edf403d0-04af-46b0-ab21-e7a620bfdedf")
bucket = "com.preservica.<Tenant-ID>.upload"
upload.upload_zip_package_to_S3(path_to_zip_package="my-large-package.zip", bucket_name=bucket, folder=folder)
Note
This upload method is only available to AWS users.
If your Preservica system is deployed on Azure you can use:
upload = UploadAPI()
client = EntityAPI()

folder = client.folder("edf403d0-04af-46b0-ab21-e7a620bfdedf")
bucket = "com.preservica.<Tenant-ID>.upload"
upload.upload_zip_package_to_Azure(path_to_zip_package="my-large-package.zip", container_name=bucket, folder=folder)
If you are writing client code which could be used on both AWS or Azure platforms or you are not sure which cloud provider your Preservica system is deployed on then you can use the following code:
upload = UploadAPI()
client = EntityAPI()

folder = client.folder("edf403d0-04af-46b0-ab21-e7a620bfdedf")
container = "com.preservica.<Tenant-ID>.upload"

upload.upload_zip_to_Source(path_to_zip_package="my-large-package.zip", container_name=container, folder=folder)
Monitoring Upload Progress
The upload_zip_package function accepts an optional Callback parameter.
The parameter references a class that pyPreservica invokes intermittently during the transfer operation.
pyPreservica executes the class’s __call__ method. For each invocation, the class is passed the
number of bytes transferred up to that point. This information can be used to implement a progress monitor.
The following Callback setting instructs pyPreservica to create an instance of the UploadProgressCallback class.
During the upload, the instance’s __call__ method will be invoked intermittently.
from pyPreservica import UploadProgressCallback
my_callback=UploadProgressCallback("my-package.zip")
upload.upload_zip_package(path_to_zip_package="my-package.zip", folder=folder, callback=my_callback)
The default pyPreservica UploadProgressCallback looks like
import os
import sys
import threading

class ProgressPercentage(object):
    def __init__(self, filename):
        self._filename = filename
        self._size = float(os.path.getsize(filename))
        self._seen_so_far = 0
        self._lock = threading.Lock()

    def __call__(self, bytes_amount):
        with self._lock:
            self._seen_so_far += bytes_amount
            percentage = (self._seen_so_far / self._size) * 100
            sys.stdout.write("\r%s  %s / %s  (%.2f%%)" % (self._filename, self._seen_so_far, self._size, percentage))
            sys.stdout.flush()
Rate Limiting Uploads
Calls to `upload_zip_package` can be rate limited to restrict the number of packages sent to the server.
For example to limit the number of uploads to 6 per minute use the following code
upload = UploadAPI()
client = EntityAPI()

folder = client.folder("edf403d0-04af-46b0-ab21-e7a620bfdedf")
upload.upload_zip_package(path_to_zip_package="my-package.zip", folder=folder, limit_per_minute=6)
If the function `upload_zip_package` is called more frequently then it will block
Creating Packages
The UploadAPI module also contains functions for creating XIPv6 packages directly from content files.
To create a package containing a single preservation Content Object (file) as part of an Asset which will be a child of specified folder
package_path = simple_asset_package(preservation_file="my-image.tiff", parent_folder=folder)
The output is a path to the zip file which can be passed directly to the upload_zip_package method
upload.upload_zip_package(path_to_zip_package=package_path)
By default the Asset title and description will be taken from the file name.
If you don’t specify an export folder the new package will be created in the system TEMP folder.
If you want to override this behaviour and explicitly specify the output folder for the package
use the export_folder argument
package_path = simple_asset_package(preservation_file="my-image.tiff", parent_folder=folder,
                                    export_folder="/mnt/export/packages")
You can specify the Asset title and description using additional keyword arguments.
package_path = simple_asset_package(preservation_file="my-image.tiff", parent_folder=folder,
                                    Title="Asset Title", Description="Asset Description")
You can also add a second Access content object to the asset. This will create an asset with two representations (Preservation & Access)
package_path = simple_asset_package(preservation_file="my-image.tiff", access_file="my-image.jpg",
                                    parent_folder=folder)
It is possible to configure the asset within the package using the following additional keyword arguments.
TitleAsset TitleDescriptionAsset DescriptionSecurityTagAsset Security TagCustomTypeAsset TypePreservation_Content_TitleContent Object Title of the Preservation ObjectPreservation_Content_DescriptionContent Object Description of the Preservation ObjectAccess_Content_TitleContent Object Title of the Access ObjectAccess_Content_DescriptionContent Object Description of the Access ObjectPreservation_Generation_LabelGeneration Label for the Preservation ObjectAccess_Generation_LabelGeneration Label for the Access ObjectAsset_MetadataDictionary of metadata schema/documents to add to the AssetIdentifiersDictionary of Asset identifiersPreservation_files_fixity_callbackFixity generation callback for preservation filesAccess_files_fixity_callbackFixity generation callback for access files
The package will contain an asset with the following structure.
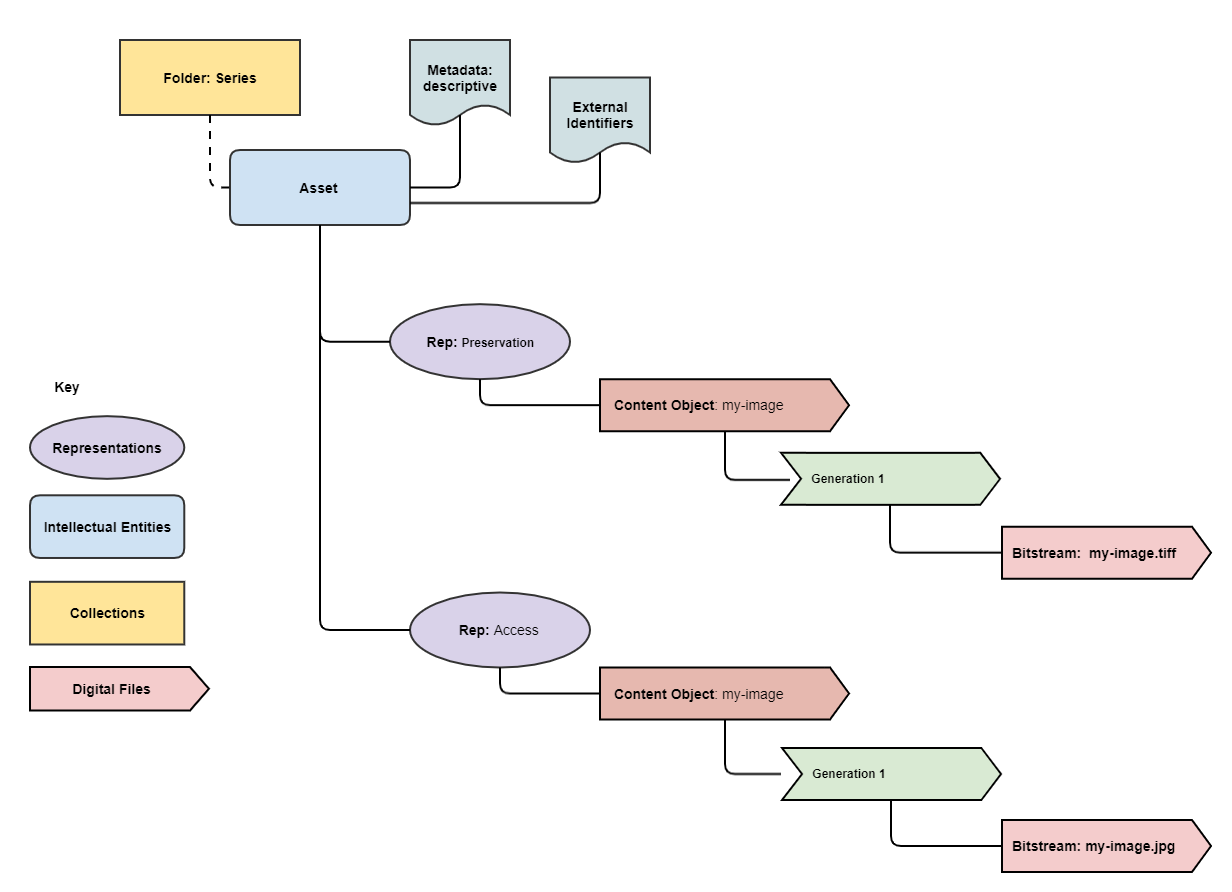
For example to add descriptive metadata and two 3rd party identifiers use the following
metadata = {"http://purl.org/dc/elements/1.1/": "dublin_core.xml"}
identifiers = {"DOI": "doi:10.1038/nphys1170", "ISBN": "978-3-16-148410-0"}
package_path = simple_asset_package(preservation_file="my-image.tiff", access_file="my-image.jpg",
                                       parent_folder=folder, Asset_Metadata=metadata, Identifiers=identifiers)
More complex assets can also be defined which contain multiple Content Objects, for example a book with multiple pages etc.
The complex_asset_package function takes a collection of preservation files and an optional collection of access files.
It creates a single asset package with multiple content objects per Representation.
Use a list collection to preserve the ordering of the content objects within the asset. For example the first page of a book should be the first item added to the list.
preservation_files = list()
preservation_files.append("page-1.tiff")
preservation_files.append("page-2.tiff")
preservation_files.append("page-3.tiff")

access_files = list()
access_files.append("book.pdf")

package_path = complex_asset_package(preservation_files_list=preservation_files, access_files_list=access_files,
                                     parent_folder=folder)
Creating Packages with Multiple Representations
If you have a single preservation and access representation then complex_asset_package will create the package you need.
If you have more than one representation of each type than you need to use generic_asset_package
generic_asset_package can be used to create as many representations as required.
generic_asset_package works the same way as complex_asset_package but instead of a list of content objects
you pass a dictionary, the key is the representation name and the value is the list of files.
preservation_representations = dict()
preservation_representations["Master"] = ["page-1.tiff", "page-2.tiff", "page-3.tiff"]
preservation_representations["BW Master"] = ["page-1.jp2", "page-2.jp2", "page-3.jp2"]
preservation_representations["Greyscale Master"] = ["page-1.tiff", "page-2.tiff", "page-3.tiff"]

access_representations = dict()
access_representations["Multi-Page Access"] = ["page-1.jpg", "page-2.jpg", "page-3.jpg"]
access_representations["Single Page Access"] = ["book.pdf"]

package_path = generic_asset_package(preservation_files_dict=preservation_representations, access_files_dict=access_representations, parent_folder=folder)
The additional keyword arguments used by complex_asset_package such as Title, Description etc are still available.
Preservica will render the first access representation, so the viewer you want to use needs to be the first entry in the dict. For example above if you want to use the multi-page book viewer as the default renderer, make “Multi-Page Access” the first entry, if you want the PDF viewer to be the default renderer, then make “Single Page Access” the first dict entry.
Custom Fixity Generation
By default the simple_asset_package and complex_asset_package routines will create packages which contain
SHA1 fixity values.
You can override this default behaviour through the use of the callback options. The pyPreservica library provides default callbacks for SHA-1, SHA256 & SHA512
Sha1FixityCallBackSha256FixityCallBackSha512FixityCallBack
To use one of the default callbacks
package_path = complex_asset_package(preservation_files_list=preservation_files, access_files_list=access_files,
                                         parent_folder=folder, Preservation_files_fixity_callback=Sha512FixityCallBack())
If you want to re-use existing externally generated fixity values for performance or integrity reasons then you can create a custom callback. The callback takes the filename and the path of the file which should have its fixity measured and should return a tuple containing the algorithm name and fixity value
class MyFixityCallback:
    def __call__(self, filename, full_path):
    ...
    ...
    return "SHA1", value
For example if your fixity values are stored in a spreadsheet (csv) files you may want something similar to:
class CSVFixityCallback:

    def __init__(self, csv_file):
        self.csv_file = csv_file

    def __call__(self, filename, full_path):
        with open(self.csv_file, mode='r', encoding='utf-8-sig') as csv_file:
            csv_reader = csv.DictReader(csv_file, delimiter=',')
            for row in csv_reader:
                if row['filename'] == filename:
                    fixity_value = row['file_checksum_sha256']
                    return "SHA256", fixity_value.lower()
            sha = FileHash(hashlib.sha256)
            return "SHA256", sha(full_path)
Bulk Package Creation
The simple_asset_package and complex_asset_package functions create a submission package containing a single Asset.
If you have many single file assets to ingest you can call these functions for each file.
For example, the code fragment below will create a single Asset package for every jpg file in a directory and upload each package to Preservica.
path = "C:\\Jpeg-Images\\"

images = [f for f in listdir(path) if isfile(join(path, f)) and f.endswith("jpg")]
files = [os.path.join(path, o) for o in images]

for file in files:
    package_path = simple_asset_package(preservation_file=file, parent_folder=folder)
    client.upload_zip_package(path_to_zip_package=package_path)
This works fine, but this will create a package for each file and an ingest workflow for each file. A more efficient way is to create a single package which contains multiple assets.
To create a multiple asset package use multi_asset_package, this takes a list of files and creates a package containing
multiple assets which will be ingested into the same folder.
The equivalent to the code above would be:
path = "C:\\Jpeg-Images\\"

images = [f for f in listdir(path) if isfile(join(path, f)) and f.endswith("jpg")]
files = [os.path.join(path, o) for o in images]

package_path = multi_asset_package(preservation_file=files, parent_folder=folder)
client.upload_zip_package(path_to_zip_package=package_path)
Package Examples
The following code samples show different ways of ingesting data into Preservica for different use cases.
Ingest a single digital file as an asset, with a progress bar during upload, delete the package after upload has completed.
from pyPreservica import *

upload = UploadAPI()

folder = "54308774-4822-4593-a8ad-970ca511caa0"

image = "./data/file.jpg"

# Create a simple package with 1 Asset and Representation and 1 CO
package = simple_asset_package(preservation_file=image, parent_folder=folder)

# Send the package via the S3 ingest bucket
# use the bucket name attached to the ingest workflow you want to use

bucket = "com.preservica.upload"

callback=UploadProgressCallback(package)

upload.upload_zip_package_to_S3(path_to_zip_package=package, bucket_name=bucket, callback=callback, delete_after_upload=True)
Ingest a single digital file as an asset, with a custom asset Title and Description
from pyPreservica import *

upload = UploadAPI()

folder = "54308774-4822-4593-a8ad-970ca511caa0"

image = "./data/file.jpg"

title = "The Asset Title"
description = "The Asset Description"

# Create a simple package with 1 Asset and Representation and 1 CO
package = simple_asset_package(preservation_file=image, parent_folder=folder, Title=title, Description=description)

# Send the package via the S3 ingest bucket
# use the bucket name attached to the ingest workflow you want to use
bucket = "com.preservica.upload"
callback=UploadProgressCallback(package)
upload.upload_zip_package_to_S3(path_to_zip_package=package, bucket_name=bucket, callback=callback, delete_after_upload=True)
Ingest each jpeg file in a directory as an individual asset
import glob
from pyPreservica import *

upload = UploadAPI()

folder = "54308774-4822-4593-a8ad-970ca511caa0"

directory = "./data/*.jpg"

# Create simple packages with 1 Asset and 1 CO for every file in the folder
bucket = "com.preservica.upload"
for image in glob.glob(directory):
    package = simple_asset_package(preservation_file=image, parent_folder=folder)
    upload.upload_zip_package_to_S3(path_to_zip_package=package, bucket_name=bucket)
Ingest a single digital file as an asset with a 3rd party identifier and custom metadata
from pyPreservica import *

upload = UploadAPI()

folder = "54308774-4822-4593-a8ad-970ca511caa0"

image = "./data/file.jpg"

# Set the Asset Title and Description

title = "My Asset Title"
description = "My Asset Description"

# Add 3rd Party Identifiers

identifiers = {"ISBN": "123-4567-938"}

# Add Description metadata

metadata = {"https://www.example.com/metadata": "./metadata/dc.xml"}

package = simple_asset_package(preservation_file=image, parent_folder=folder,
                                Title=title, Description=description, Identifiers=identifiers, Asset_Metadata=metadata)

bucket = "com.preservica.upload"

upload.upload_zip_package_to_S3(path_to_zip_package=package, bucket_name=bucket, delete_after_upload=True)
Create a single Asset with 2 Representations (Preservation and Access) each Representation has 1 Content Object
from pyPreservica import *

upload = UploadAPI()

folder = "54308774-4822-4593-a8ad-970ca511caa0"

access_image = "./jpeg/file.jpg"
preservation_image = "./tiff/file.tif"

package = simple_asset_package(preservation_file=preservation_image, access_file=access_image,
                                parent_folder=folder)

bucket = "com.preservica.upload"
upload.upload_zip_package_to_S3(path_to_zip_package=package, bucket_name=bucket, delete_after_upload=True)
Create a package with 1 Asset 2 Representations (Preservation and Access) and multiple Content Objects (one for every image)
import glob
from pyPreservica import *

upload = UploadAPI()

folder = "54308774-4822-4593-a8ad-970ca511caa0"

access_images = "./data/*.jpg"
preservation_images = "./data2/*.tif"

package = complex_asset_package(preservation_files_list=glob.glob(preservation_images),
                                access_files_list=glob.glob(access_images),
                                parent_folder=folder)

bucket = "com.preservica.upload"
upload.upload_zip_package_to_S3(path_to_zip_package=package, bucket_name=bucket, delete_after_upload=True)
Spreadsheet Metadata
pyPreservica now provides some experimental support for working with metadata in spreadsheets. The library provides support for generating descriptive metadata XML documents for each row in a spreadsheet, creating an XSD schema for the XML documents and creating a custom transform for viewing the metadata in the UA portal along side a custom search index.
Before working with the spreadsheet it should be saved as a UTF-8 CSV document within Excel.
CSV to XML works by extracting each row of a spreadsheet and creating a single XML document for each row. The spreadsheet columns are the XML attributes.
The XML namespace and root element need to be provided. You also need to specify which column should be used to name the XML files.
csv_to_xml(csv_file="my-spreadsheet.csv", root_element="Metadata", file_name_column="filename", xml_namespace="https://test.com/Metadata")
This will read the my-spreadsheet.csv csv file and create a set of XML documents, one for each row in the csv file.
The XML files will be named after the value in the filename column.
The resulting XML documents will look like
<?xml version='1.0' encoding='utf-8'?>
<Metadata xmlns="https://test.com/Metadata">
    <Column1>....</Column1>
    <Column2>....</Column2>
    <Column3>....</Column3>
    <Column4>....</Column4>
</Metadata>
You can create a XSD schema for the documents by calling
csv_to_xsd(csv_file="my-spreadsheet.csv", root_element="Metadata", xml_namespace="https://test.com/Metadata")
Which will generate a document Metadata.xsd
<?xml version='1.0' encoding='utf-8'?>
<xs:schema xmlns:xs="http://www.w3.org/2001/XMLSchema" attributeFormDefault="unqualified" elementFormDefault="qualified"
           targetNamespace="https://test.com/Metadata">
    <xs:element name="Metadata">
        <xs:complexType>
            <xs:sequence>
                <xs:element type="xs:string" name="Column1" />
                <xs:element type="xs:string" name="Column2" />
                <xs:element type="xs:string" name="Column3" />
                <xs:element type="xs:string" name="Column4" />
            </xs:sequence>
        </xs:complexType>
    </xs:element>
</xs:schema>
To display the resulting metadata in the UA portal you will need a CMIS transform to tell Preservica which attributes to display. You can generate one by calling
csv_to_cmis_xslt(csv_file="my-spreadsheet.csv", root_element="Metadata", title="My Metadata Title",
       xml_namespace="https://test.com/Metadata")
You can also auto-generate a custom search index document which will add indexes for each column in the spreadsheet
csv_to_search_xml(csv_file="my-spreadsheet.csv", root_element="Metadata",
       xml_namespace="https://test.com/Metadata")
Ingest Web Video
pyPreservica now contains the ability to ingest web video directly from video hosting sites such as YouTube and others. To use this functionality you need to install the additional Python Project youtube_dl
$ pip install --upgrade youtube_dl
You can ingest videos directly with only the video site URL You also need to tell Preservica which folder the new video asset will be ingested into.
upload = UploadAPI()
client = EntityAPI()

folder = client.folder("edf403d0-04af-46b0-ab21-e7a620bfdedf")

upload.ingest_web_video(url="https://www.youtube.com/watch?v=4GCr9gljY7s", parent_folder=folder)
The new asset will get the title and description from youtube metadata. The asset will be given the default security tag of “open”.
The video is downloaded from the web hosting platform to the local client running the Python script and then uploaded to Preservica.
It will work with most sites that host video, for example using c-span.
upload = UploadAPI()
client = EntityAPI()

cspan_url = "https://www.c-span.org/video/?508691-1/ceremonial-swearing-democratic-senator-padilla"
folder = client.folder("edf403d0-04af-46b0-ab21-e7a620bfdedf")

upload.ingest_web_video(url=cspan_url, parent_folder=folder)
or UK parliament
upload = UploadAPI()
client = EntityAPI()

uk_url = "https://parliamentlive.tv/event/index/b886f44b-0e65-47bc-b506-d0e805c01f4b"
folder = client.folder("edf403d0-04af-46b0-ab21-e7a620bfdedf")

upload.ingest_web_video(url=uk_url, parent_folder=folder)
The asset will automatically have a title and description pulled from the original site.
You can override the default title, description and security tag with optional arguments and add 3rd party identifiers.
upload = UploadAPI()
client = EntityAPI()

identifier_map = {"Type": "youtube.com"}

url = "https://www.youtube.com/watch?v=4GCr9gljY7s"
title = "Preservica Cloud Edition: Keeping your digital assets safe and accessible"

folder = client.folder("edf403d0-04af-46b0-ab21-e7a620bfdedf")

upload.ingest_web_video(url=url, parent_folder=folder, Identifiers=identifier_map, Title=title, SecurityTag="public")
Ingest Twitter Feeds
To use this functionality you need to install the additional Python Project tweepy
$ pip install --upgrade tweepy
The Twitter API is authenticated, this means that unlike youtube you need a set of API credentials to read tweets even if the tweets are public and you have a twitter account.
You can apply for API Consumer Keys (The basic ready only set is required) at:
https://developer.twitter.com/
You will need the consumer key and secret. Your twitter API keys and tokens should be guarded very carefully.
Warning
Twitter no longer provides free API read access. See: https://developer.twitter.com/
You can harvest and ingest tweets using a single call on the upload class using ingest_twitter_feed method.
You should pass the name of the twitter feed you want to crawl and the number of tweets as the first two arguments. You also need to tell the call which folder you want the tweet assets to be ingested into.
The twitter API Consumer Keys can either be passed as arguments to the call or be specified in the credential.properties
file or an environment variable using the keys: TWITTER_CONSUMER_KEY and TWITTER_SECRET_KEY
upload = UploadAPI()

twitter_name = "Preservica"
number_tweets = 25
folder_id = "77802d22-ee48-4e46-9b29-46118246cad1"
folder = entity.folder(folder_id)

upload.ingest_twitter_feed(twitter_user=twitter_name, num_tweets=number_tweets, folder=folder, twitter_consumer_key="xxxx", twitter_secret_key="zzzz")
Note
If you need a free alternative to the paid for Twitter API and you only need to ingest your own tweets, then you could try the preserva-tweet command line application https://pypi.org/project/preserva-tweet/
This library provides a Python module which will ingest a Twitter export zip file into Preservica as individual tweets with any attached media files such as images or video. The tweets can then be rendered directly from within Preservica.
Crawl and ingest from a filesystem
The UploadAPI class provides a mechanism for users to crawl and ingest all digital files on a filesystem. The crawl will replicate the on disk folder structure in Preservica.
You provide the function the path to the data to be ingested, an bucket connected to an ingest workflow and the Preservica collection to ingest into.
upload = UploadAPI()

upload.crawl_filesystem(filesystem_path="/my/path/data", bucket_name="com.bucket",
                        preservica_parent="daa88307-4a0b-4962-a5a9-6a1387f9f876")